![]() Every time you visit a website on your iPhone or iPad, you are sharing information about yourself with the outside world. This guide runs through a number of methods you can use to gain more control over what gets shared, and who it gets shared with, whenever you use Apple’s Safari browser to access the web on an iOS device.
Every time you visit a website on your iPhone or iPad, you are sharing information about yourself with the outside world. This guide runs through a number of methods you can use to gain more control over what gets shared, and who it gets shared with, whenever you use Apple’s Safari browser to access the web on an iOS device.
It also covers some methods you can use to prevent traces of your browsing history from showing up on your iOS devices. While you may trust friends and family not to go searching through your web history, it’s possible for them to unintentionally discover what you’ve been looking at, just by using Safari or performing a simple Spotlight search on your iPhone or iPad.
The guide assumes you are using the latest public release of iOS 9.3 (9.3.3 as of initial writing). If your device is running an older version, a message should have appeared on the screen that an update is available. Connect your device to a power source and then tap “Install Now” on the message to download the update over the air, or open the Settings app and tap General -> Software Update, and then tap “Download and Install”.
Alternatively, connect your device to a computer with an internet connection and with the latest version of iTunes 12 installed. Open iTunes, select your device (a device icon should appear just below the playback controls), click “Summary” in the sidebar, and then click “Check for Update” in the Summary screen. Click “Download and Update” if an update dialog appears.
Cookies, Location Services, and Tracking
Many websites attempt to store cookies and other web page data on iOS devices. Cookies are small data files that can include things like your IP address, device type, web browser version, the date you last visited the site, as well as any personal information you have provided, such as your name, email address, and any relevant preferences. This information is used to identify you when you revisit a site, so that it can offer tailored services, provide specific content, or display targeted ads.
Websites are increasingly upfront about their use of cookies – you’ve probably seen notices on popular sites requesting that you acknowledge their use. That’s largely because EU law requires sites based within its borders to get consent from visitors to store or retrieve cookie data, and as of September 2015, Google requires that any website using its advertising products comply with the law if any of its users are inside the EU, regardless of where the site itself is based.
By default, Safari accepts cookies and website data only from websites you visit, and attempts to block third-party cookies that try to target you with ads or create a profile of your online activities. If you don’t like the idea of being tracked at all, you can selectively block the use of cookies by following the numbered steps below. Note however that some pages might not work unless you allow the use of cookies, so if you run into login problems or other issues on familiar sites after adjusting these settings, then you might want to dial back the changes.
Additionally, Do Not Track is another feature you can enable to try to prevent sites from tracking your web visits across the web. With the feature turned on, Safari specifically asks sites and their third party content providers (including advertisers) not to track you. In reality, it’s up to the website to honor this request, but it’s an option worth enabling for a potential extra layer of privacy.
Lastly, you may have noticed how Safari asks if you want to share your location whenever you visit a geolocation-enabled website. If you don’t expect the site to provide helpful location-based services such as weather information or local amenities, you can deny individual requests and continue to do so on a case-by-case basis. Alternatively, you can disable location services in Safari completely, which is also described in the following steps.
- On your iOS device, open the Settings app, scroll down the list, and tap “Safari”.
- In Safari settings, tap “Block Cookies” under the Privacy & Security options, and choose one of the following: Always Block, Allow from Current Websites Only, Allow from Websites I Visit, or Always Allow.
- Toggle on the button next to “Do Not Track”.
- Return to the first menu in the Settings app and select “Privacy” from the list.
- Tap “Location Services”, scroll down the list and select “Safari Websites”, and then tap on “Never” in the next screen. Again, be aware that defaulting to “Never” may impact the functionality of some sites you visit.

Enable Private Browsing
By enabling Private Browsing, you can prevent Safari from remembering the pages you visit and any AutoFill information, while any private tabs you open won’t be stored in iCloud. When using Private Browsing, Safari also automatically asks sites and third-party content providers not to track you, prevents sites from modifying any information stored on your iOS device, and deletes cookies when you close the related tab.
- In Safari, tap the Pages icon (consisting of two squares) to bring up the open tabs view, and then tap “Private”. Notice how the interface turns a dark gray.
- Tap the “+” icon to open a private tab.
- When you’re done with the web session, return to the open tabs view, close your tabs, and tap “Private” again. Your private tabs are now cleared from memory.

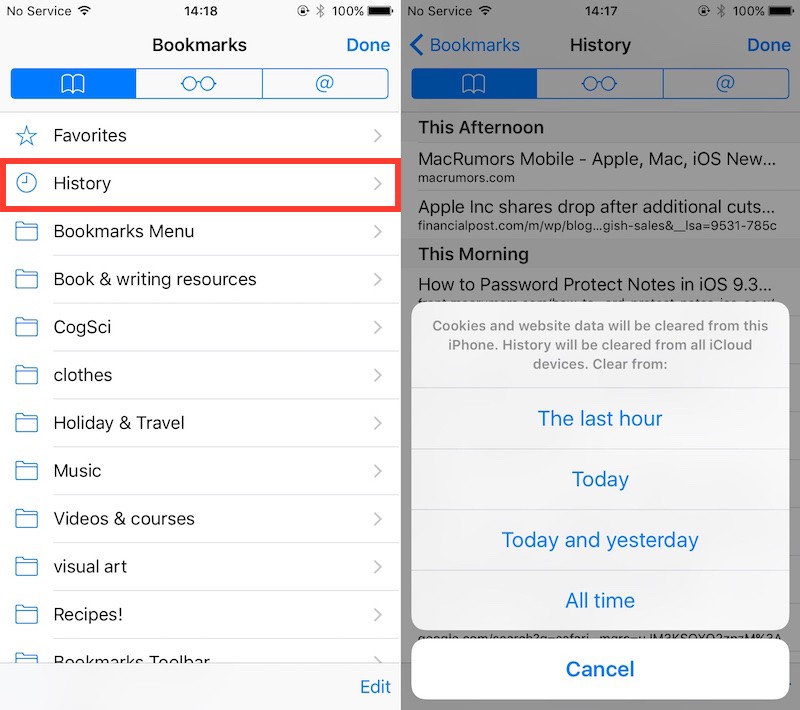
Clear Browsing History
Clearing your web history in Safari has changed with iOS 9. You can no longer clear your history without also deleting all cookies and web data. This may affect stored login data for certain sites, so think twice before proceeding.
The first method described below is the ‘nuke’ option since it clears all history, cookies and website data on all devices signed into your iCloud account regardless of when the sites were accessed.
- Open the Settings app and scroll down to Safari in the list.
- At the bottom of the options screen, tap “Clear History and Website Data”.

The following alternative method allows you to limit the clearing of history, cookies and website data to a specific timeframe.
- Open Safari and tap the Bookmarks icon (the open book).
- Tap the first Bookmarks tab if it’s not already selected and select “History” from near the top of the list.
- Tap “Clear” and select the option you prefer from the following: The last hour; Today; Today and yesterday; and All time.
Exclude Browsing History From Spotlight Searches
If you’d like to retain your browsing history but don’t want web pages you’ve visited to appear in Spotlight Search results, follow these steps.
- Open the Settings app and tap “General”.
- Select “Spotlight Search”, scroll down the Search Results list, and toggle off the switch for Safari.

Switch Search Engine and Disable Safari Suggestions
Just because you cleared your browsing history and web data in Safari or browsed in a Private window, doesn’t mean your searches aren’t still recorded elsewhere. For example, if you logged into a Google account during the session, searches you performed may be logged by Google and later show up as search suggestions when you start typing in the Google search bar when logged into the same account. In fact, your search and ad results may be customized based on your search-related activity, even if you’re signed out of your account.
To get around this issue, either consult the privacy help page of your preferred search engine to learn how to turn off tracking settings, or add a non-tracking search engine such as StartPage to your favorites (visit the site, tap the Share icon – the square with an arrow pointing out of it – and tap the star icon to “Add to Favorites”). The next series of steps shows you how to set Safari to use non-tracking search engine DuckDuckGo when you type in search queries into the address bar.
Another thing to reconsider is your use of Safari Suggestions. With this option enabled, your search queries, the Safari Suggestions you select, and related usage data are sent to Apple. Additionally, if you have Location Services turned on, when you make a search query in Safari with Safari Suggestions enabled your location is also sent to Apple. If you don’t want this information shared, turn off Safari Suggestions, which is also described in the steps below.
- Open the Settings app and scroll down to Safari in the list.
- In the Search options list, toggle off the “Search Engine Suggestions” and “Safari Suggestions” switches.
- Tap “Search Engine” at the top of the list, and select DuckDuckGo from the available options.

Disable Frequently Visited Sites
By default, Frequently Visited Sites appear below your Favorites whenever you open a new tab in Safari. You can turn this feature off.
- Open the Settings app, scroll down and tap “Safari” in the list.
- Toggle off “Frequently Visited Sites” under the General section.

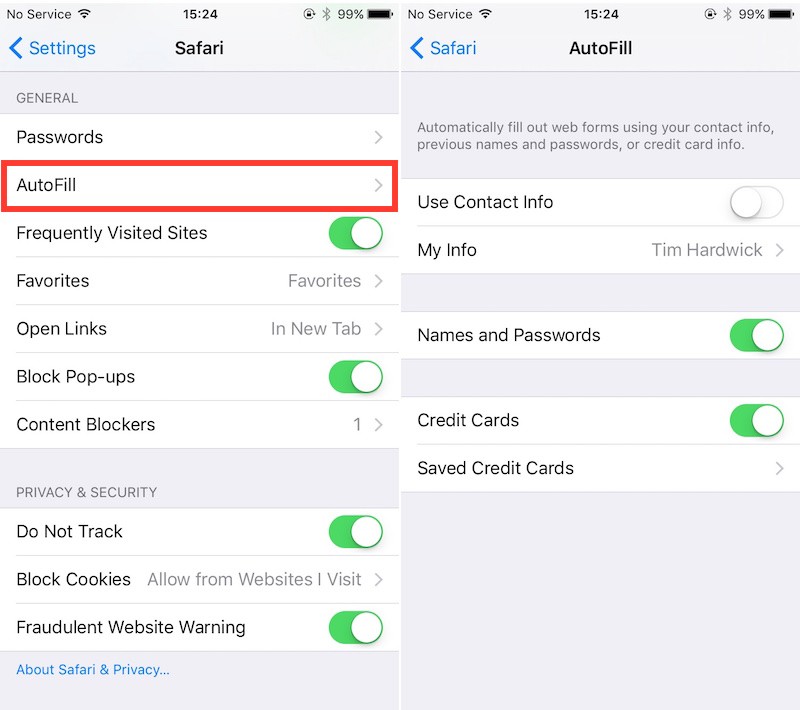
Turn Off AutoFill
Safari’s AutoFill feature remembers text and values you enter into online forms, and can be useful for speeding up logins and registrations as well as online purchases. If other people use your iOS device, you might not want this information to show up when websites are revisited. Here’s how to disable AutoFill.
- Open the Settings app, scroll down, and tap on “Safari” in the list.
- Tap to open the AutoFill menu and toggle off the switch next to the details you’d rather not include. You can also edit/delete stored bank cards from here by tapping “Saved Credit Cards”.
Finally…
If your privacy concerns extend to a desire for enhanced security and anonymity, consider subscribing to a Virtual Private Network (VPN) service that offers an iOS client or supports OpenVPN (Private Internet Access and IPVanish are two popular options), and using a Tor-powered browser for iOS.
Discuss this article in our forums
Source: MAC ROUMORS